Sending logs to the browser from actions and loaders
One of the inherent benefits of Single Page Apps(SPAs) I took for granted was the logging that comes out of the box via the Network tab in the console. Every api request happens in the browser and you can easily inspect those which is super handy.
Once you move to something like Remix/React Router 7, you become painfully aware that you've lost access to that since most of your api requests are now happening on the server in actions and loaders. This is a Major Bummer 🫡 when coming from the SPA world. Instead, you have to manually log those in your loaders and actions and inspect those where your logs go during development: commonly your terminal or a file.
This kinda stinks for a couple of reasons:
- Even though I can
console.login my backend code and UI code in the same file, I have to see in them in two different places. - The backend logs are strings and can be really hard to inspect any data being logged.
These things make me sad. Let's change that.
Prefer video? Check out the video version of this on YouTube.
The strategy
When I'm developing my app, I want both the backend and any frontend logs to be in the same place. A place I can monitor as I poke around in my app. Naturally the browser's console is the ideal destination.
We need a way to send logs from the backend to the browser in realtime. Enter Server-sent events, a close cousin of WebSockets. While WebSockets support sending and receiving messages to your backend, server-sent events only support sending messages from your backend which is exactly what we need.
Backend setup
We need a few pieces in place. First, we'll create a singleton store so services we create will persist across hot module reloads and we're always guaranteed to get the same instances everywhere we ask for them.
// app/service/singleton.server.ts

// yoinked from https://github.com/jenseng/abuse-the-platform/blob/main/app/utils/singleton.ts

export function singleton<T>(name: string, valueFactory: () => T): T {
  const yolo = global as any;
  yolo.__singletons ??= {};
  yolo.__singletons[name] ??= valueFactory();
  return yolo.__singletons[name];
}
Next, we'll create an instance of a node EventEmitter. We'll attach an event listener to this and use it in our SSE(server-sent events) connection to send messages to the browser.
// app/server/emitter.server.ts
import { EventEmitter } from "node:events";
import { singleton } from "~/service/singleton.server";

export let emitter = singleton("emitter", () => new EventEmitter());
And now we'll use the popular winston logger package which let's you direct logs to all sorts of places: console, file, http endpoint, ...event emitter? We'll need to implement a custom "transport" for that.
// app/service/logger.server.ts
import winston, { Logger } from "winston";
import Transport from "winston-transport";
import { singleton } from "~/service/singleton.server";
import { emitter } from "~/service/emitter.server";

class EmitterTransport extends Transport {
  log(info: any, callback: () => void) {
    setImmediate(() => {
      this.emit("logged", info);
    });

    let eventName = "log";

    emitter.emit(eventName, JSON.stringify(info));

    callback();
  }
}

export let logger: Logger = singleton("logger", () => {
  const instance = winston.createLogger({
    level: process.env.NODE_ENV !== "production" ? "debug" : "info",
    transports: [new winston.transports.Console()]
  });

  if (process.env.NODE_ENV !== "production") {
    instance.add(new EmitterTransport());
  }
  return instance;
});
With this setup, any logged messages will go to the terminal and be emitted as JSON stringified messages during development. Notice the "log" event name as the first argument to emitter.emit(). This event name is arbitrary but it will need to match up to the event name in our SSE connection.
Side note: winston is completely optional. You could just emitter.emit() directly in your actions and loaders. Leveraging a logging library just makes a lot of sense here because that's exactly what we're doing, logging!
We'll implement the connection now by leveraging Sergio Xalambrí's awesome remix-utils package which makes creating an SSE connection a breeze. We're going to do this in a /logs route.
// app/routes/logs.ts
import { eventStream } from "remix-utils/sse/server";
import { emitter } from "~/service/emitter.server";
import type { Route } from "./+types/logs";

export async function loader({ request }: Route.LoaderArgs) {
  if (process.env.NODE_ENV !== "development") {
    throw new Error("SSE logging is only for development, silly!");
  }
  let eventName = "log"; // <- this must match emitter.emit(eventName, ...)

  return eventStream(
    request.signal,
    (send) => {
      let handle = (data: string) => {
        send({ event: eventName, data });
      };

      emitter.on(eventName, handle);

      return () => {
        emitter.off(eventName, handle);
      };
    },
    {
      // Tip: You need this if using Nginx as a reverse proxy
      headers: { "X-Accel-Buffering": "no" },
    },
  );
}
(You don't even have to install the complete remix-utils package if you don't want to. You could copy/paste the single file from your repo and use it that way.)
When the browser connects to this via the EventSource object, it keeps the connection alive so any log event will be sent over any open connections.
The last step in the backend is to actually make use of the logger which could look something like this.
// app/routes/contact.tsx
import { hrtime } from 'node:process'
import { logger } from '~/service/logger.server'
import type { Route } from './+types/route'

export async function loader({params}): Route.LoaderArgs {
  let url = `https://address-book.com/api/contacts/${params.id}` // <- not real
  let [res, ms] = await time(async () => {
      const response = await fetch(url)
      return {
        status: response.status,
        data: await response.json()
      }
  })
  logger.info('fetch contact', {
    method: 'GET',
    url,
    status: res.status,
    response: res.data,
    ms
  })
  return data
}

// simple utility for tracking how long a function takes
async function time<T>(cb: () => T) {
  let start = hrtime.bigint();
  let value = await cb();
  let end = hrtime.bigint();
  let ms = Number(end - start) / 1_000_000;
  return [value, ms] as const;
}
Frontend setup
Now let's turn our attention to the frontend. It's finally time to establish our SSE connection in our root route.
// app/root.tsx

// ...

export async function loader() {
  return {
    sseLogging: process.env.NODE_ENV === "development",
  };
}

export default function App({ loaderData }: Route.ComponentProps) {
  let { sseLogging } = loaderData;
  useEffect(() => {
    // only establish a connection if sseLogging is turned on
    if (!sseLogging) return;
    const source = new EventSource("/logs");
    const handler = (e: MessageEvent) => {
      try {
        // attempt to parse the incoming message as json
        console.log(JSON.parse(e.data));
      } catch (err) {
        // otherwise log it as is
        console.log(e.data);
      }
    };
    let eventName = "log" // <- must match the event name we use in the backend
    source.addEventListener(eventName, handler);
    return () => {
      source.removeEventListener(eventName, handler);
      source.close();
    };
  }, [sseLogging]);

  return <Outlet />;
}

// ...
We're establishing the connection in a useEffect , listening for logs, attempting to parse them as json and log that, otherwise, log the message string as is.
Why not useEventSource???
"Whoa, whoa, whoa... you're using eventStream from remix-utils and that package comes with useEventSource. Why the heck aren't you using that???"
Great question! I tried. useEventSource stores the latest message in a useState and it's up to you to "listen" to it in a useEffect if you're not just rendering the latest message. Here's what it would look like.
let message = useEventSource("/logs", { event: "log" });

useEffect(() => {
  if (!message) return
  try {
    console.log(JSON.parse(message));
  } catch (err) {
    console.log(message);
  }
}, [message])
The problem I ran into is that because the message is being stored in a useState, the messages are bound to react's rendering and update lifecycle. If I logged multiple messages back to back in a loader some of them would get swallowed because (I believe) react is debouncing them and trying to be efficient for rendering, which isn't what we're doing here. That's just not going to work for this use-case.
Success!
In any case, we can now do a victory dance! 🕺 If we have the app loaded and navigate to a route that has a loader where we're doing some logging we should see those in the browser console. 😎
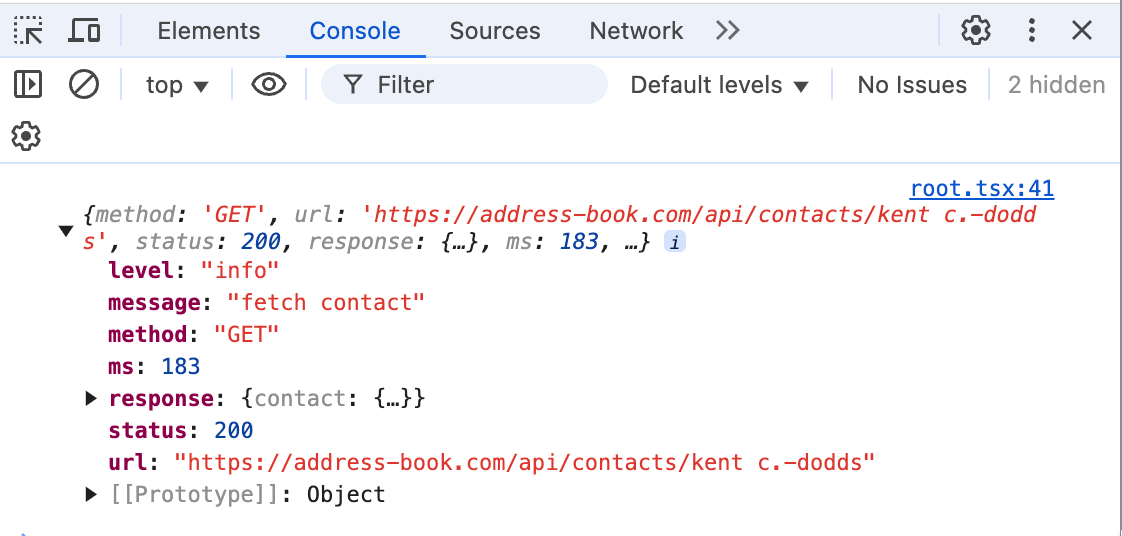
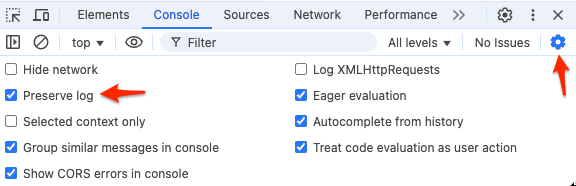
If you completely reload the browser tab you'll see the log message show up but immediately get wiped because the loader for the next request runs, sends the SSE message over the current connection, but then Chrome will clear your console. You can somewhat get around this if you click the ⚙️ icon in the console window and select Preserve log to retain logs between tab refreshes.
I say "somewhat" because any objects logged will show up as "Object" in the console and it looks like you can expand it but that memory is gone. It's like a ghost object just there to tease you. 👻
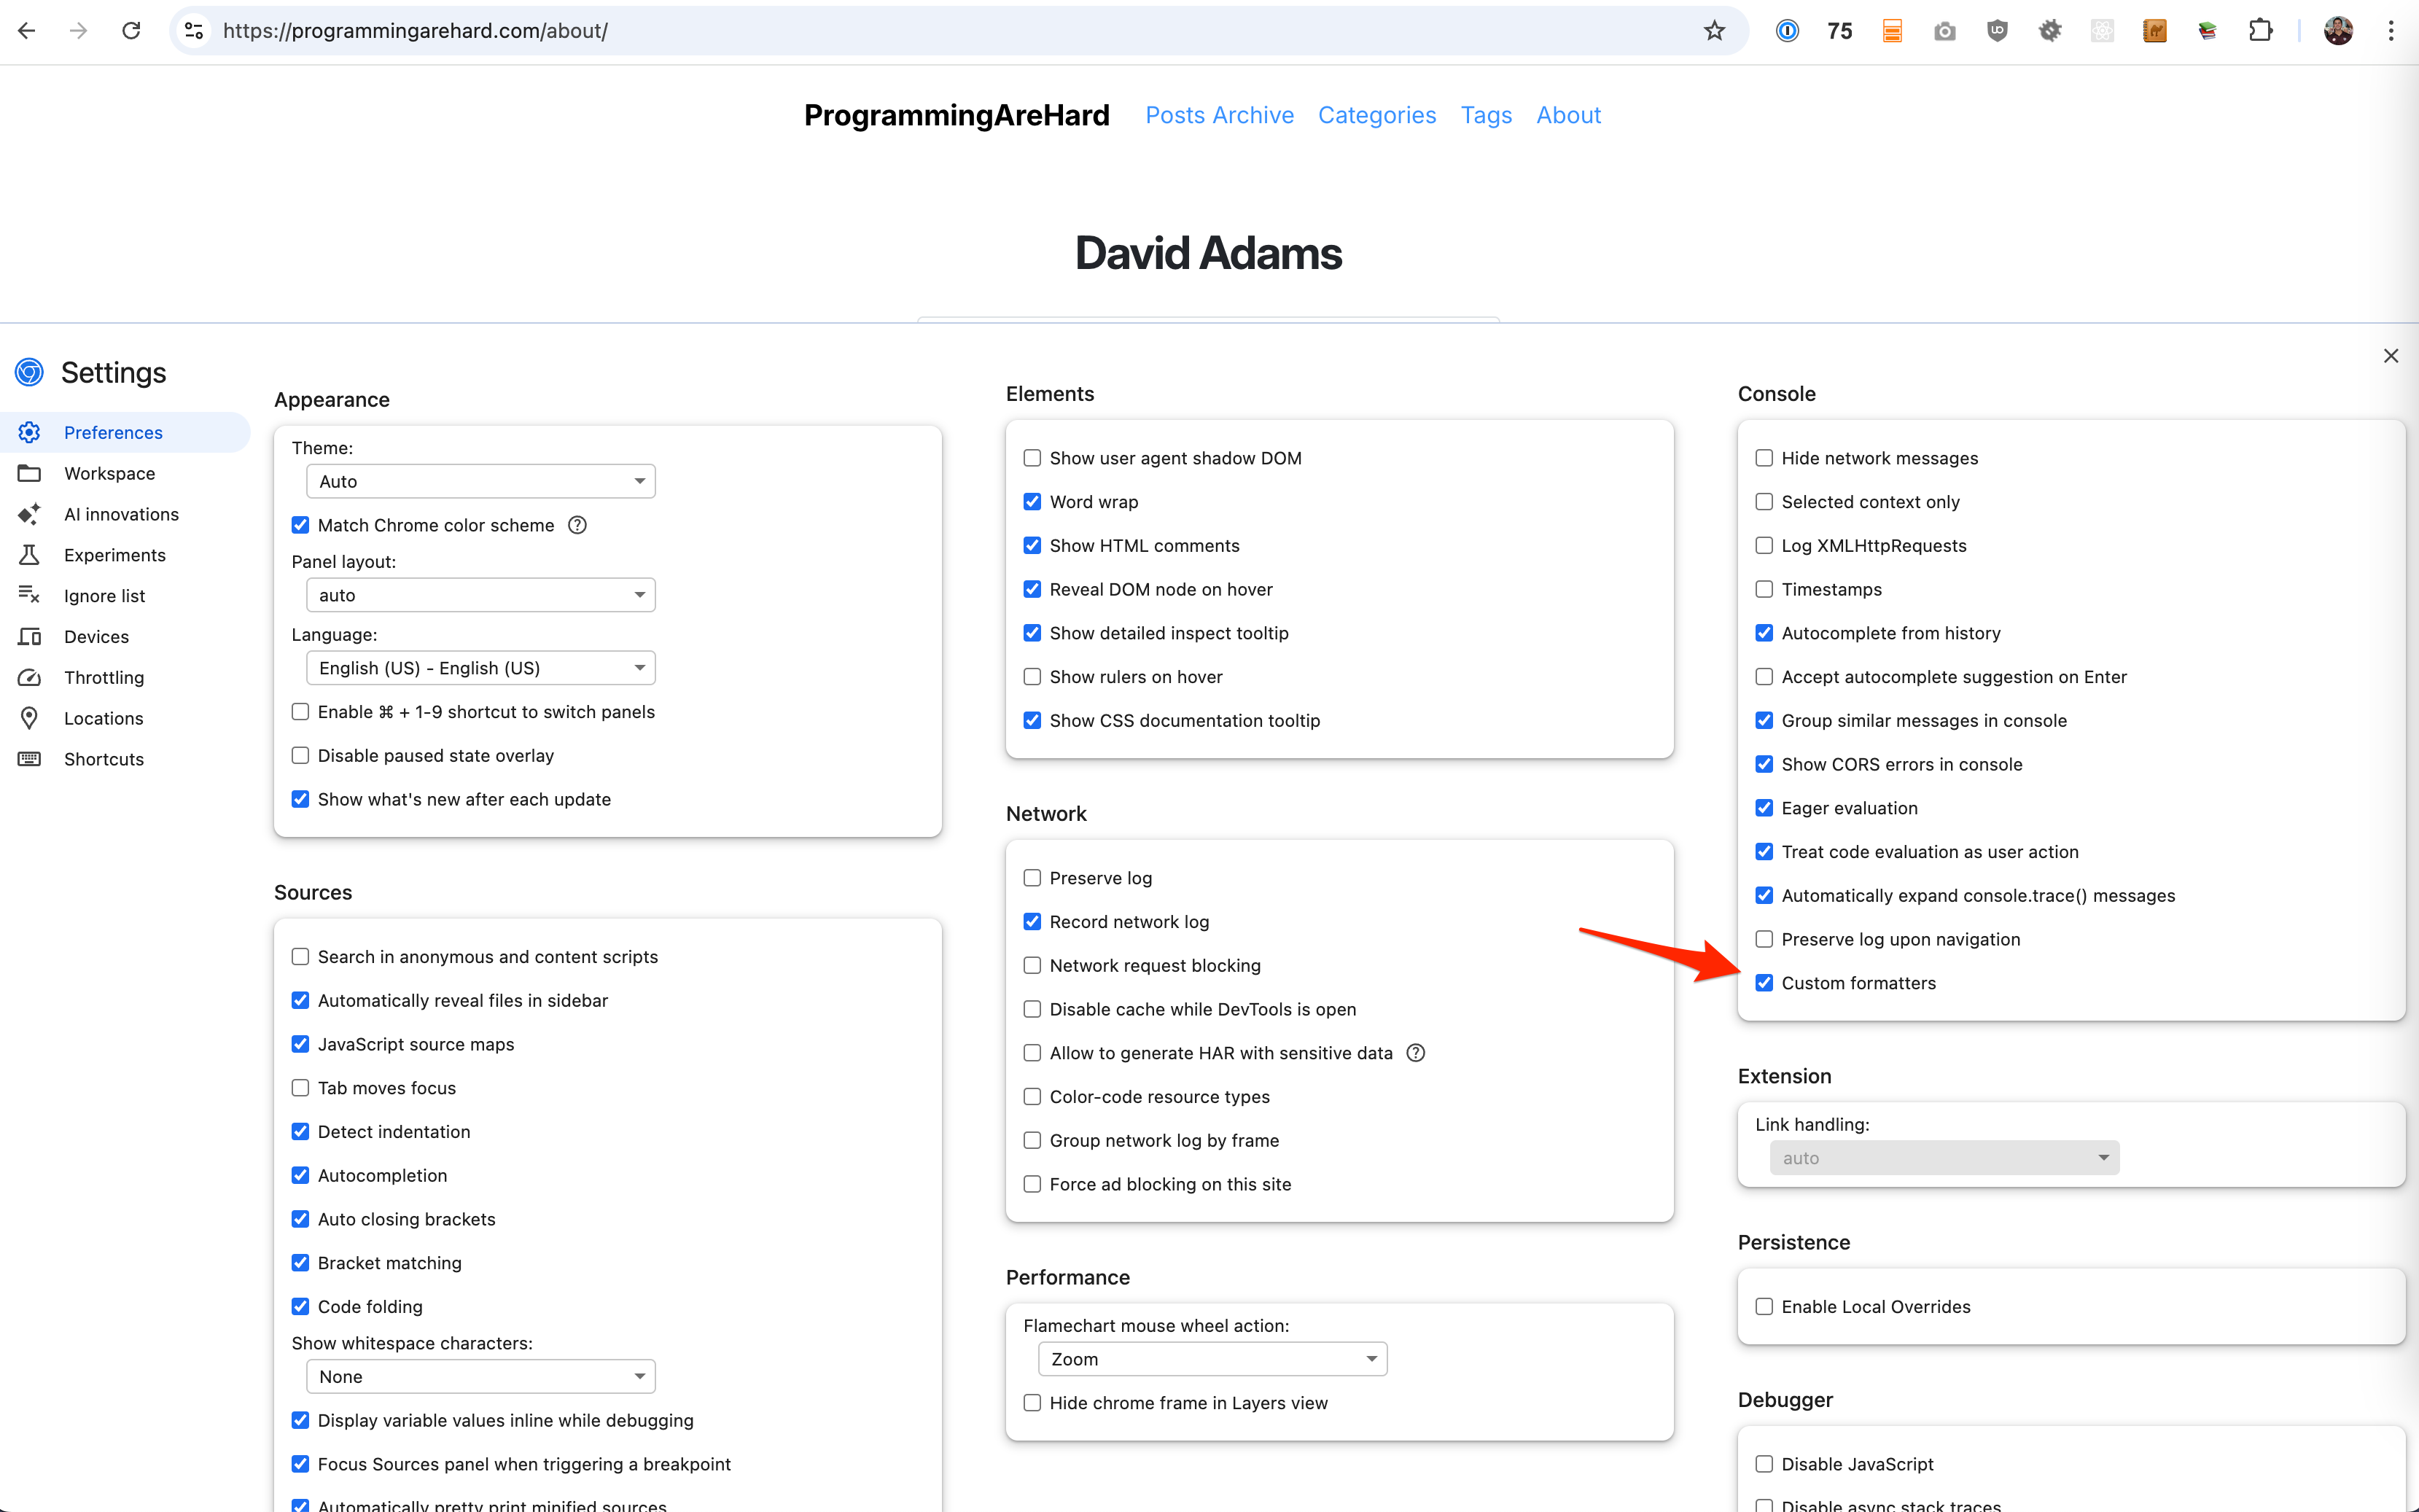
Going try hard in Chromium based browsers
This is already incredibly useful but we can do better if we're using a Chromium based browser. The console has the ability for you to add custom object formatters. If you click the ⚙️ icon in the dev tools window(the other cog icon in the screenshot above), you can toggle this feature on.
A custom formatter is an instance of a class that has up to three methods: header(obj), hasBody(obj), and body(obj). Each object can have a "header" and then optionally have the ability to be expanded. Think about when you log an object with several properties. The console doesn't automatically expand the object. It shows you the "header", a truncated representation of the object and then you have the ability to expand its "body" to see all of the properties.
Let's write our own formatter for api requests/responses we make in our actions and loaders. We need a way to distinguish that our custom formatter should apply to these logs so let's introduce a __type property that's set to "api". This is a completely arbitrary way for us to identify these log objects in our formatter.
  logger.info('create todo', {
    __type: 'api',
    method: 'POST',
    url,
    status: res.status,
    payload,
    response: res.data,
    ms
  })
And now let's look for that when implementing a custom formatter.
// app/dev/ApiObjectFormatter.js

class ApiObjectFormatter {
  header(obj) {
    if (obj.__type !== "api") {
      return null;
    }
    const method = obj.method.toUpperCase();
    const methodColor = {
      POST: "blue",
      PUT: "orange",
      PATCH: "salmon",
      GET: "green",
      DELETE: "red",
    }[method];
    const status = obj.status;
    const isOkay = status >= 200 && status < 300;
    const color = isOkay ? "green" : "red";
    return [
      "div",
      {},
      [
        "span",
        {
          style: `color: ${methodColor}; font-weight: bold;`,
        },
        `[${obj.method.toUpperCase()}]`,
      ],
      ["span", {}, ` ${obj.url}`],
      ["span", { style: `color: ${color};` }, ` [${obj.status}]`],
      ["span", { style: `color: slategrey;` }, ` (${obj.ms} ms)`],
    ];
  }

  hasBody(obj) {
    if (obj.__type !== "api") {
      return null;
    }
    return obj.response || obj.payload || obj.message;
  }

  body(obj) {
    const responseRef = ["object", { object: obj.response }];
    const requestRef = ["object", { object: obj.payload }];

    return [
      "div",
      { style: "padding-left: 20px; padding-top: 5px;" },
      obj.message
        ? [
            "div",
            {},
            ["span", { style: "font-weight: bold;" }, "Message: "],
            ["span", {}, obj.message],
          ]
        : null,
      obj.payload
        ? [
            "div",
            {},
            ["span", { style: "font-weight: bold;" }, "Payload: "],
            ["span", {}, requestRef],
          ]
        : null,
      obj.response
        ? [
            "div",
            {},
            ["span", { style: "font-weight: bold;" }, "Response: "],
            ["span", {}, responseRef],
          ]
        : null,
    ].filter(Boolean);
  }
}

window.devtoolsFormatters = window.devtoolsFormatters || [];
window.devtoolsFormatters.push(new ApiObjectFormatter());
Kinda funky, eh? It reminds me of what react looks like without JSX. You define a hierarchy of elements. Each element is represented by an array where the first item is the html tag, the second item is an object of styles, and the third is the children(which can be more elements or object references).
Next, we need a way to actually have this run in the browser. Let's revisit our root route.
// app/root.tsx
import ApiObjectFormatter from "~/dev/ApiObjectFormatter.js?raw";

export async function loader() {
  return {
    sseLogging: process.env.NODE_ENV === "development",
    customObjectFormatters:
      process.env.NODE_ENV === "development" ? [ApiObjectFormatter] : [],
  };
}

export default function App({ loaderData }: Route.ComponentProps) {
  const { sseLogging, customObjectFormatters } = loaderData;
  // ...
  return (
    <>
      {customObjectFormatters.length > 0 ? (
        <script
          dangerouslySetInnerHTML={{
            __html: customObjectFormatters.join("\n"),
          }}
        />
      ) : null}
      <Outlet />
    </>
  );
}
You might have noticed that we wrote the ApiObjectFormatter in javascript, not typescript. This is so we can use vite's ?raw suffix on the import and get it as a string. Once we have it as a string we can optionally send it to the browser based on any condition we come up with in our loader. We won't ever be bloating our client bundles with this console formatting code. We also don't have to go through the hassle of putting this into a Chrome extension to distribute to our team. It can be completely custom to your app's needs, live within the repo, and just works out of the box(if they've got custom formatters turned on). 🔥
So what's it look like? Check it out.

Pretty dang slick. As we click around in our app we can see what's happening behind the scenes right where it's most convenient. We have the most important bits in the header and can expand to see the body which includes the request payload and json response.
You might have also noticed that customObjectFormatters is an array. You can go nuts here adding custom formatters that:
- format messages differently for the various log levels(info, warn, error, etc)
- format database queries (results and timing)
- format domain events being fired. Ex.
{event: 'user-registered'}
The sky's the limit.
console.log() stigma
The console has some pretty handy utilities that I think a lot of people aren't aware of and I think that's partly due to the stigma around even making using of console.log() on the frontend. These days everyone has eslint rules that complain about console logging to stop you from appearing unprofessional by accidentally shipping those. I get that. But, I also think there's a lot of missed opportunity for cool stuff to be explored, especially if you're triggering logs from your backend in a controlled manner during development.
What about production?
What we did here is meant for development. Theoretically, you could use this idea in production but you would definitely need to make some changes:
- Enable the
/logsendpoint for production and only allow specific users(admins) - Subscribe to an
eventNamethat is tied to the current user rather than a super genericlogevent name. Ex.log.user.123 - return that
eventNamefrom the root loader to be used in theEventSourcelistener - Include the user id in all of your logs
- Update the
EmitterTransportto use the user specificeventName(log.user.123) based on the user data that comes with the logs
There's a lot that could go wrong here, so I'm not recommending this but I did want to address the idea before anyone puts this in prod without thinking too much about it.
Repo
Here's the repo where you can see all of this wired up. dadamssg/address-book#sse-logging
Alight, hope you found this useful and got your wheels turning. If you like this type of stuff, you can drop your email in the box below and I'll send you a message whenever I write more posts and publish more videos. ✌️
