Zero to Jenkins - PHP Continuous Integration
Jenkins is an incredibly powerful continuous integration server. It allows us to automate all sorts of things through "Jobs". When using Jenkins with a php project we can automate cloning our project, using Composer to grab vendor packages, generating API documentation, running PHPUnit tests and code coverage reports, and all sorts of other tasks. This is all to make sure your project stays healthy. This post will walk you through how to set up Jenkins to use with a Laravel project.
More of a visual learner? Go straight to the video
Let's get started
The first thing we need to do is obtain a suitable server/virtual machine to install Jenkins. I went to PuPHPet and set up a VM using its default selection as a base but with the following modifications:
- Ubuntu Precise 12.04 x64
- Nginx
- The php5-xsl php module
Jenkins does not need any of the above to operate(besides an OS). These are just my preferences. However, this guide does assume you are running Ubuntu Precise 12.04 x64. Our Laravel project and the tools we'll be using require Composer and the php5-xsl php module.
Install Jenkins and plugins
Once you have a VM booted, SSH into it and let's first run sudo apt-get update to make our box aware of the new/latest packages it can install.
nstall Jenkins, simply issue the following, apt-get install jenkins. It will prompt you to continue, press y and hit Enter. This will install Jenkins and get it running on port 8080. Visit http://your-ip-address:8080 and you should see Jenkins.
Next, we need to use a Jenkins command line tool to install some plugins.
#move the command line tool to our root directory
wget http://localhost:8080/jnlpJars/jenkins-cli.jar

#install plugins to use with our php project
java -jar jenkins-cli.jar -s http://localhost:8080 install-plugin checkstyle cloverphp dry htmlpublisher jdepend plot pmd violations xunit

#restart Jenkins for the plugins to take effect
java -jar jenkins-cli.jar -s http://localhost:8080 safe-restart
Install the php job template
Sebastian Bergmann, the creator of PHPUnit, has put together a Jenkins job template for php projects. We can use this as a starting point to create a job. Install it by doing the following.
#get the php job template
curl https://raw.github.com/sebastianbergmann/php-jenkins-template/master/config.xml | java -jar jenkins-cli.jar -s http://localhost:8080 create-job php-template

#restart Jenkins for the template to be recognized
java -jar jenkins-cli.jar -s http://localhost:8080 safe-restart
Once we have the template we need to change its file permissions. Go into the jobs directory with cd /var/libs/jenkins/jobs and then change the permissions with chown -R jenkins:jenkins php-template.
Update Jenkins
We need to update Jenkins now. If you click the Manage Jenkins link in the left sidebar you will most likely see some yellow text, telling you a newer version is available. Update to the latest version by doing the following.
#stop Jenkins
/etc/init.d/jenkins stop

#download the latest war file to the /usr/share/jenkins/ directory
wget -P /usr/share/jenkins/ http://mirrors.jenkins-ci.org/war/latest/jenkins.war

#restart Jenkins
java -jar jenkins-cli.jar -s http://localhost:8080 safe-restart
Re-key in background now and Dismiss this message buttons.
Update existing plugins and install the Git Plugin
Since we udated Jenkins, we need to update some plugins. Go to Manage Jenkins -> Manage Plugins**. Check all of the boxes and select the Download now and install after restart button.
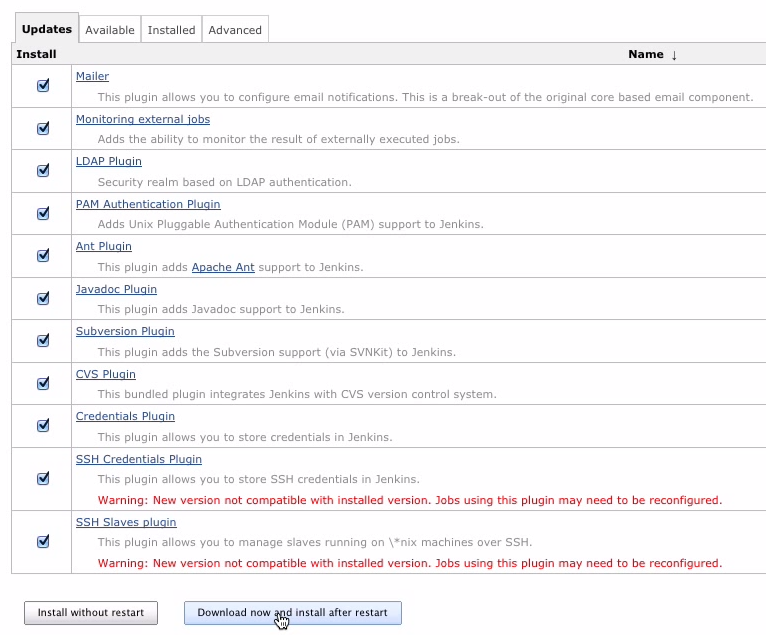
For our builds, we're going to use Git to clone our project to always start with a clean slate. For this to occur we need to install the Git Plugin. Grab the Git Plugin by clicking on the Available tab and checking the box next to Git Plugin. Click on the Download now and install after restart button. Restart Jenkins again for those plugins to be installed.
Secure Jenkins
As of now Jenkins is completeley insecure. Anyone can visit it in their browser and start messing around. We should fix this.
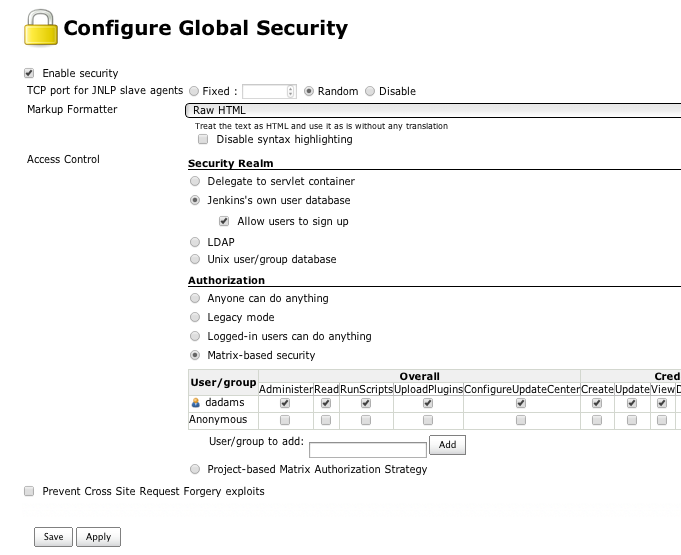
Go to Manage Jenkins -> Configure Global Security. Check the Enable security box. Select the Jenkin's own user database with the Allow users to sign up box checked in the Access Control -> Security Realm section. This will allow you and others to create user accounts.
Next, in the Authorization section, select Matrix-based security. In the User/group to add: field enter the username you want to use to access Jenkins for yourself. Click the Add button and select all of the boxes next to the newly added username. Leave the Anonymous boxes unchecked. Click Save.
You should be immediately taken to a login screen now that security is enabled. Click the Create an account link. Fill out the sign up form using the same username you enabled all access for. Click Sign up and you should now be logged in.
/etc/init.d/jenkins stop. Use Vim to edit the Jenkins config file, sudo vim /var/lib/jenkins/config.xml. Locate the <useSecurity>true</useSecurity> line and changed it to <useSecurity>false</useSecurity>. Save it and restart Jenkins, /etc/init.d/jenkins start. Now Jenkins will be started in an insecure mode and you can go back and configure the global security correctly.
Prepare a php project
I've created a build-ready Laravel project on BitBucket. Clone or fork that into your own git repository to use.
Create an SSH key pair
Next, we need to set up an SSH key pair for Jenkins to communicate with our repo. Change to the Jenkins user, sudo su jenkins, and navigate into the directory where we're going to store our key pair, cd /var/lib/jenkins/.ssh.
Create a key pair with the following command, ssh-keygen -t rsa -C "[email protected]". Press Enter to save the pair as id_rsa. Press Enter again when prompted to enter a passphrase. The passphrase needs to be blank. Confirm the blank passphrase again by pressing Enter. This will create two files, id_rsa and id_rsa.pub, the private and public key, respectively.
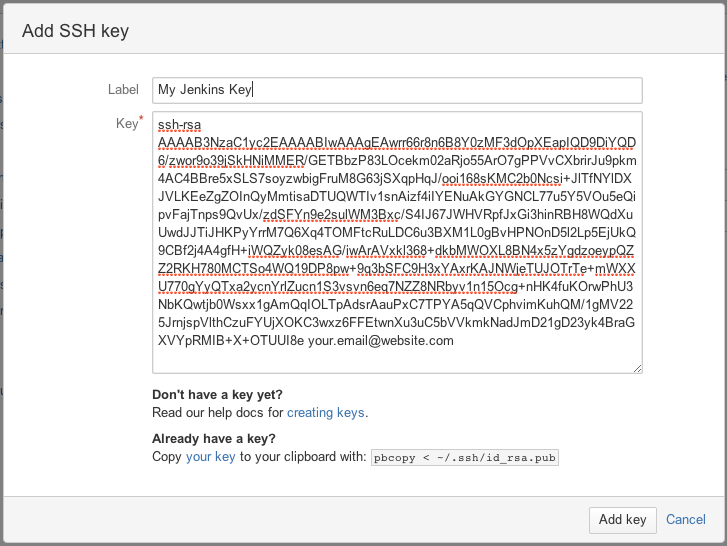
Now that we've created a key pair, we need to add the public key to the repository. View your public key with cat id_rsa.pub. Copy the key to your clipboard.
d your public key to BitBucket, click on the user icon at the top right of the page and select Manage account -> SSH keys. Click the Add key button, paste your key into the Key field, and Label it however you like.
Back in the command line, we need to establish that connection. Enter ssh -T [email protected], type yes when prompted and push Enter. It should now tell you that git can now be used to connect to BitBucket.
Create a new Jenkins job
We can now create a new job. Go to Manage Jenkins -> New Job. Enter a title for this new job in the Job name field. Don't use any spaces in your Job name though. We're going to use this in a url later. Select the Copy existing Job option and enter php-template in the Copy from field. Click OK.
s make sure our new job has the correct permissions. Change into the jobs directory with cd /var/libs/jenkins/jobs and then change the permissions with chown -R jenkins:jenkins your-project-name.
Configure the job
Now we need to tell Jenkins what this job is suppose to do.
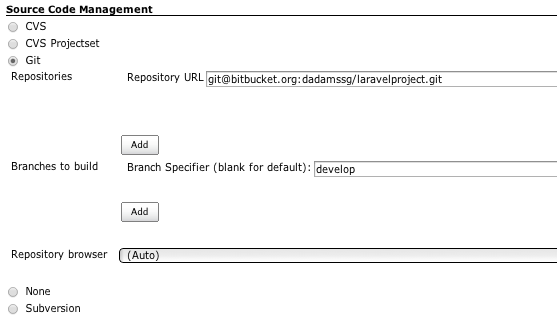
In the Source Code Management section(provided by the Git Plugin), choose Git. Copy your git url into the Repository URL and type develop in the Branches to build field. At the beginning of each build, Jenkins will now clone the develop git branch and perform the build.
In the next section, Build Triggers, select the Trigger builds remotely box and enter an Authentication Token. This will allow us to queue a build by hitting a url. The Authentication Token should remain secret. Because it will be used in a url, I recommend using only letters, numbers, and/or dashes.
It's time to specify the build steps now.
In the Build section, Delete the default Invoke Ant step.
Add a build step by selecting Add build step -> Execute shell. After the cloning of the project we want to use Composer to get our vendor packages. Type composer update in the Command text area.
After installing our dependencies with Composer, we want to use Phing to handle the rest of the build. Add another build step and in this build step's Command field enter vendor/bin/phing -logger phing.listener.NoBannerLogger. Phing uses the .xml files at the root of our project to determine what to do. Some of the tasks include: creating a build directory to store reports, running PHPUnit, generating API documentation, and more. Explore the build.xml file a bit to learn more about what all phing is doing.
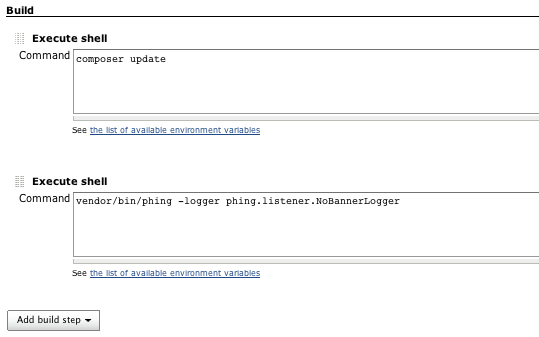
Scroll down to the Publish HTML reports section. We need to correct a path. Our build is generating API documentation and Jenkins is providing a link to those docs on the Jenkins project's homepage. Because we're using the php-template and I've modified the project structure a bit, we need to change the HTML directory to archive to build/api/html. This will set the correct path to access our generated documentation.
Finish by clicking Save
Configure Git
Because we're using git to clone our project, it needs to know who it's acting on behalf of. To inform git, first, run git config --global user.email "[email protected]" and git config --global user.name "jenkins".
Is it time to build yet?
Yes. Yes it is. In the left sidebar of Jenkins click the Build Now link. It will eventually fail because it's trying to download too many packages from GitHub while being unauthenticated. We can fix this by changing into the job directory, cd /var/lib/jenkins/jobs/your-project-name and manually running Composer with composer update. After a few successful package downloads, you will be prompted to enter your GitHub credentials. When you do, the packages will continue to be downloaded.
Click Build Now again and the build should finally successfully complete!
Create a Jenkins hook
The beautiful thing about Jenkins is that we can automate builds. We can trigger a build to be queued up when we push code to our repository.
To do this we need to get our Jenkins user API Token. Go to Manage Jenkins -> Manage Users. Click on your user account and click the Configure link in the left sidebar. Click Show API Token... and copy the token to your clipboard.
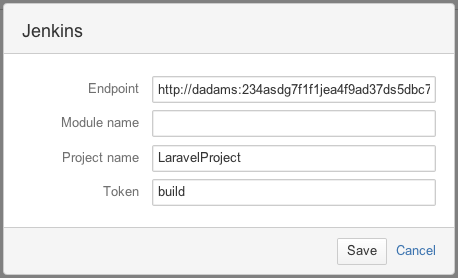
Back in BitBucket, click the cog icon in the upper right corner. Select Hooks. Choose Jenkins in the dropdown and press Add hook.
Specify your endpoint with the following pattern: http://jenkins-username:jenkins-api-token@your-ip-address:8080/
It should look something like this: http://dadams:[email protected]:8080/
We can leave the Module name blank. Specify the your Jenkins project in the Project name field. Put the same build token specified in the Build Triggers section in Jenkins in the Token field. Click Save. Now, every time we push code to the repo a build will get triggered.
Enjoy the awesome
If you go back to the project's homepage, you can now view all of the results in reports, charts, graphs, API docs, and an interactive code browser. Sweet! We've just automated a whole lot of extremely useful tasks.
Helpful Resources
Zero to Jenkins | Full Length Video
The benefit of Jenkins
Categories: PHP
